
Recessed Lights is an iconic & compelling system that is employed by both new and remodeled homes nowadays. It is an excellent option for those who seek functional lighting that should hide in the ceiling. In fact, many people accept that these lights have changed the appearance of their rooms. They offer a gentle glow in the area due to which mood can light up.
However, a good reason individuals opt to keep away from the recessed lights is worrying about the installation process. It is a myth that there are lots of complications involved that an average homeowner can’t tackle. If you are thinking same, then we will change it with this post for sure as our team is going to show you how easier it is. If you still want to go on a safer side, then a trained and qualified electrician is the right choice to make.
Steps Needed To Follow For Installing Recessed Lights
To complete the installation process adequately, there is a need to follow certain steps. It is important to make sure everything goes smoothly and safely without causing any problem. In case you doubt about any of them, it is better to seek the advice of a professional. Let’s check out steps mentioned below:
Step One – Getting Electrical Permits
The majority of American jurisdictions ask a permit from the homeowners if they want a new circuit or want to extend the present one. Please check out the website of your county’s jurisdiction to know the right method for obtaining permits.
We can’t write about them as conditions vary from one state to another and that’s why suggesting readers to check them online first.
Step Two – Switch Boxes Installation
Once you obtain permits, there will be a need for switches using which you can control the recessed lights. The majority of recessed lighting installations come with own switches for boosting the convenience. However, we believe that already present wall switches are adequate for giving control for individual fixtures or few multiple fixtures.
If you don’t know, the switch boxes are affixed to the wall studs for convenient connection. You can even set multiple switch boxes together for getting a super clean look and easier wiring.
Step Three – Making Arrangements for Wiring Fixtures
The next step you need to perform is to create a fully explained wiring plan. For this purpose, it is better to go for a professional electrician for ensuring that these recessed lighting fixtures & related switches get installed according to the code specifications. Effective wiring is the base of a professional installation.
Please use a specialized drill bit for this purpose as it will make sure wiring gets installed properly. On the other hand, you should use a right angle drill for reaching tighter spaces.
Step Four – Connecting Wires to the Fixtures
As we have already written, there may be a need for a particular type of wire depending on the state’s electrical codes for installation of recessed lighting fixtures. A qualified electrician from your area will easily understand such requirements. Generally, a 12 gauge cable is used in the majority of cases along with a ground wire and two insulated conductor wires.
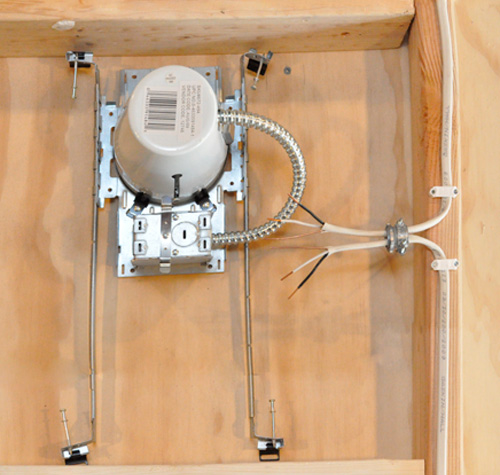
image credit:oneprojectcloser.com
Also, the cable is jacketed using a non-metallic plastic jacket for extra protection. They are pulled across the already drilled holes starting from one end and works across the other one. The Rule of Eights formula is usually used by electricians while routing cables to new switch boxes and lighting cables. The presence of this rule makes sure the electrician get adequate wire for working with all the installation locations along with proper security.
Step Five – Fixing Connections
The fifth step that needs to be performed while wiring of the recessed lights is fixing connections. It means the cables should be placed and fastened correctly. The individual recessed light fixtures need to be wired in this step. As we all know, all the fixtures will have a junction box for extra convenience. The knockout tabs are removed by the electrician allowing the cables to pass through the box. The clamping work of these cables with the junction box is performed after that using special box clamps.
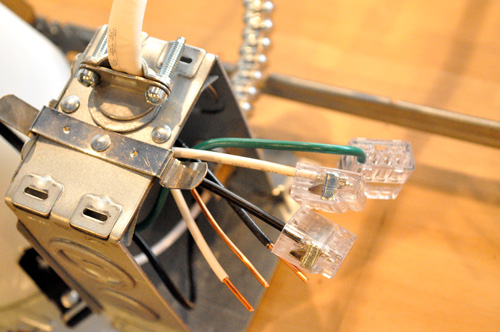
After that, almost half an inch of insulation is removed from the ends of black, white, and green ground wires using a stripper. Please understand that the wires come out & in from the box for fixtures that are installed in series. The connection of wires is connected in the following manner:
- A wire cut is used for connecting all the three black wires.
- Other white or neutral wires need to be connected collectively in the same manner.
- The junction box’s ground screw should be connected to the other surface of the box if there is a ground wire present.
- The wire nut connections are wrapped up using electrical tape to avoid unraveling by the majority of electricians.
Step Six – Switching Connections
The installation process of recessed lighting wires has almost completed as the only thing left is wiring the individual switch boxes. Performing this step will result in the completion of the circuit. There is a need for pulling a cable from the very first installed fixture once the fixtures get wired. The cable is secured using a box clamp for better connection followed it.
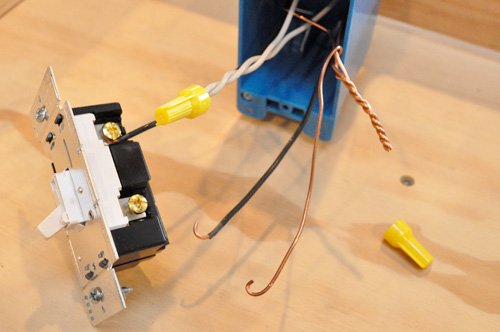
The main circuit has a black power wire that needs to be routed into the box. The stripping of insulation is performed from the ends of the wires along with making the connection of each black wire to the brass screw that located on the switch. The white wire stays neutral and doesn’t connect to the switch. Instead, they need to be twisted & connected using a wire nut. Furthermore, every green ground wire needs to be twisted together & clamped to the screw located on the switch in the green color. After the completion of this wiring process, the circuit will be tested by the electrician for ensuring the safety of the system correctly.
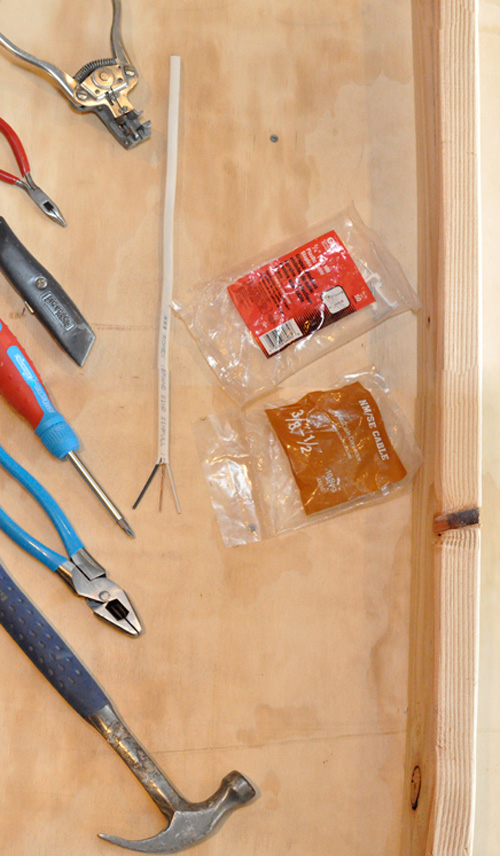
What kinds of tools needed for wiring recessed lights?
The process of wiring recessed lighting can’t be completed if you don’t have the desired set of tools. We have mentioned about them with proper details below:
-
Wire Strippers
It is one of the standard tools that most of the homes usually have.
-
Utility Knife
This equipment comes with a small sharp blade that ensures you can easily cut the wires.
-
Screwdriver
It is no brainer to think that anyone won’t be aware of this equipment.
-
Other necessary tools
In addition to the tools mentioned above, you need to keep equipment like lineman’s pliers, hammer, and needle-nose pliers handy during the installation process.
All the tools mentioned here are usually kept by the electricians as they need it for performing everyday tasks.
Conclusion
We believe that you have already wired the recessed lights in your home by following the steps mentioned in the guide. Do you believe there is something missed in the post or there is an issue related to wiring of recessed lights? If yes, then it is ideal for writing about it in the comment section so an expert from your team can answer it adequately.